x

For any questions, customizations or quotes, please call us at 1.800.519.5753 or e-mail: info@homesaunakits.com

Visit us in store at 271 Shoemaker St, Unit #2, Kitchener, ON, N2E 3B3. Showroom hours are 9am to 4pm.

Online ordering temporarily disabled - Please call us at 1.800.519.5753 or e-mail: info@homesaunakits.com

Pinterest

How Our Custom Sauna Builder Tool Helps You Build Your Own Sauna From the Start

To successfully build your own sauna, you must calculate the exact cubic footage of your room and match it to a heater with the correct kilowatt output before buying materials. Most DIY errors stem from purchasing a heater that is too weak for the room’s volume or ignoring insulation requirements. This guide explains how to use our custom builder tool to plan a sauna that fits your space and performs efficiently.

Why Building Your Own Sauna Requires More Than Just Choosing a Kit

Building a functional sauna requires precise coordination between room volume, insulation quality, and heater capacity to ensure the room reaches a safe and comfortable temperature.

Many homeowners assume a standard kit is a “one-size-fits-all” fix. This is almost never true. A generic kit often clashes with the specific limitations of your basement or backyard.

One major mistake is picking dimensions that don’t match standard lumber lengths. This leads to wasted material and extra cutting. Heater mismatch is even more critical.

If your heater is too weak for the volume, the room will remain cold. If it is too powerful, it will shut off constantly. This creates a harsh, uneven heat.

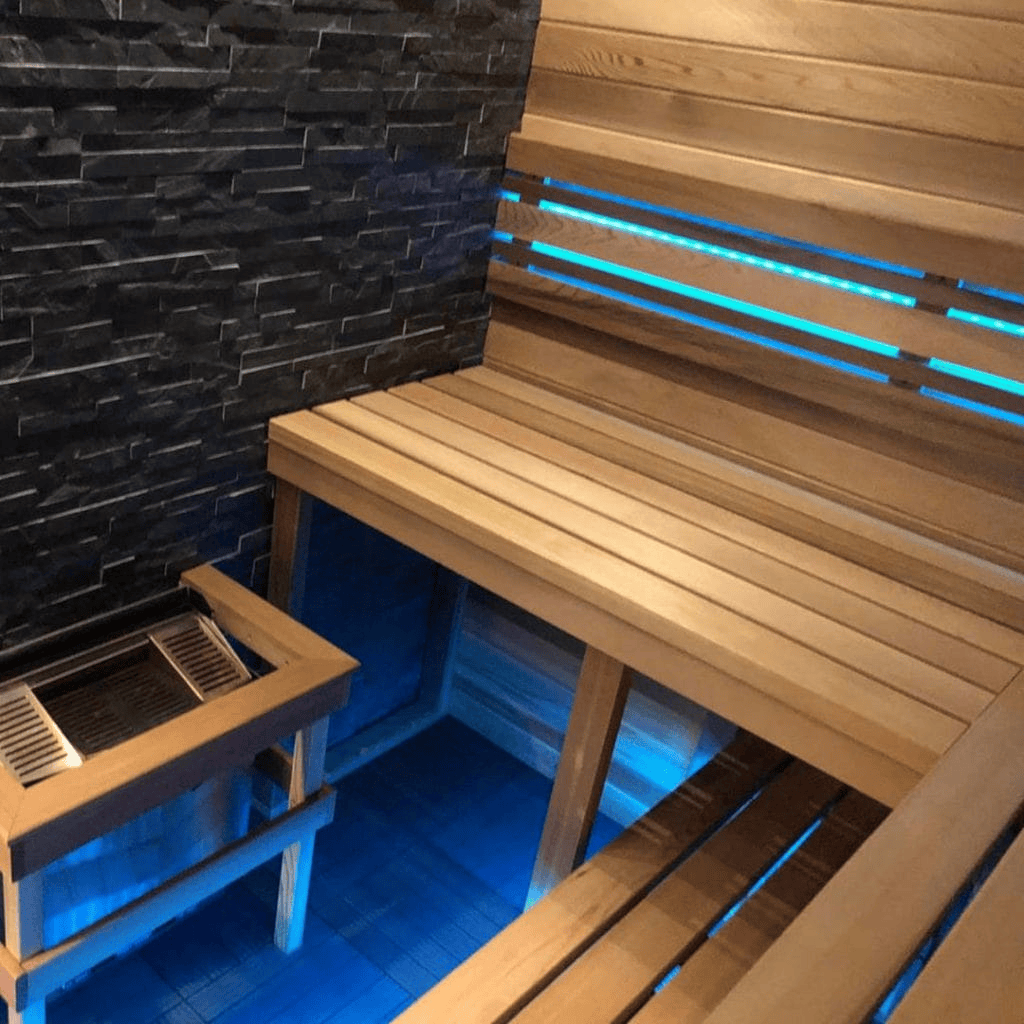
Ceiling height matters too. A ceiling that is too high traps heat where you can’t feel it. Bad bench layouts can also ruin the vibe. If benches are too narrow or close together, you can’t relax.

Our custom builder tool solves this. It forces you to address these variables upfront so everything works together.

How Our Custom Sauna Builder Tool Works Step by Step

Our custom sauna builder tool digitizes the planning process to calculate compatible components and material lists based on your specific inputs.

The tool removes the complicated math from your project. You don’t need to be an architect to get a professional result. We structured the logic to guarantee technical compatibility.

Here is the simple process:

  • Select Sauna Type: Choose between an indoor or outdoor setup.
  • Input Dimensions: Enter your exact width, depth, and height.
  • Select Wood Species: Pick your material, like a cedar sauna package.
  • Configure Bench Layout: Visualize the seating to maximize comfort.
  • Heater Selection: The tool picks a heater that matches your design’s volume.
  • Review: Verify every spec before you order.

This configuration happens before you spend a dime. You can see exactly what fits. This prevents the headache of ordering a kit that doesn’t fit your walls.

Selecting Your Layout and Wood Type

Choosing your layout and wood type early dictates the structural integrity and long-term durability of your sauna.

The first step is deciding between an indoor sauna kit and an outdoor sauna kit. Outdoor units need specific roofing and weatherproofing that indoor units do not. The tool adjusts for these needs instantly.

Material choice is just as important. We suggest Western Red Cedar. It naturally resists decay and stays cool to the touch. You can even select specific grades, like Clear Western Red Cedar, to get the look you want.

Layout planning changes how the room feels. A drawing might look big enough, but reality is different. By using the tool, you ensure the benches offer enough room to recline comfortably.

Matching the Heater to the Space

The builder tool automatically calculates the cubic footage of your design to recommend the precise heater output (kW) required for optimal performance.

Heater sizing is a mathematical calculation, not a guess. An undersized heater will run forever without getting hot enough.

The tool analyzes your dimensions. It then suggests heaters that handle that specific volume. This ensures you don’t waste electricity or suffer through a lukewarm sauna session.

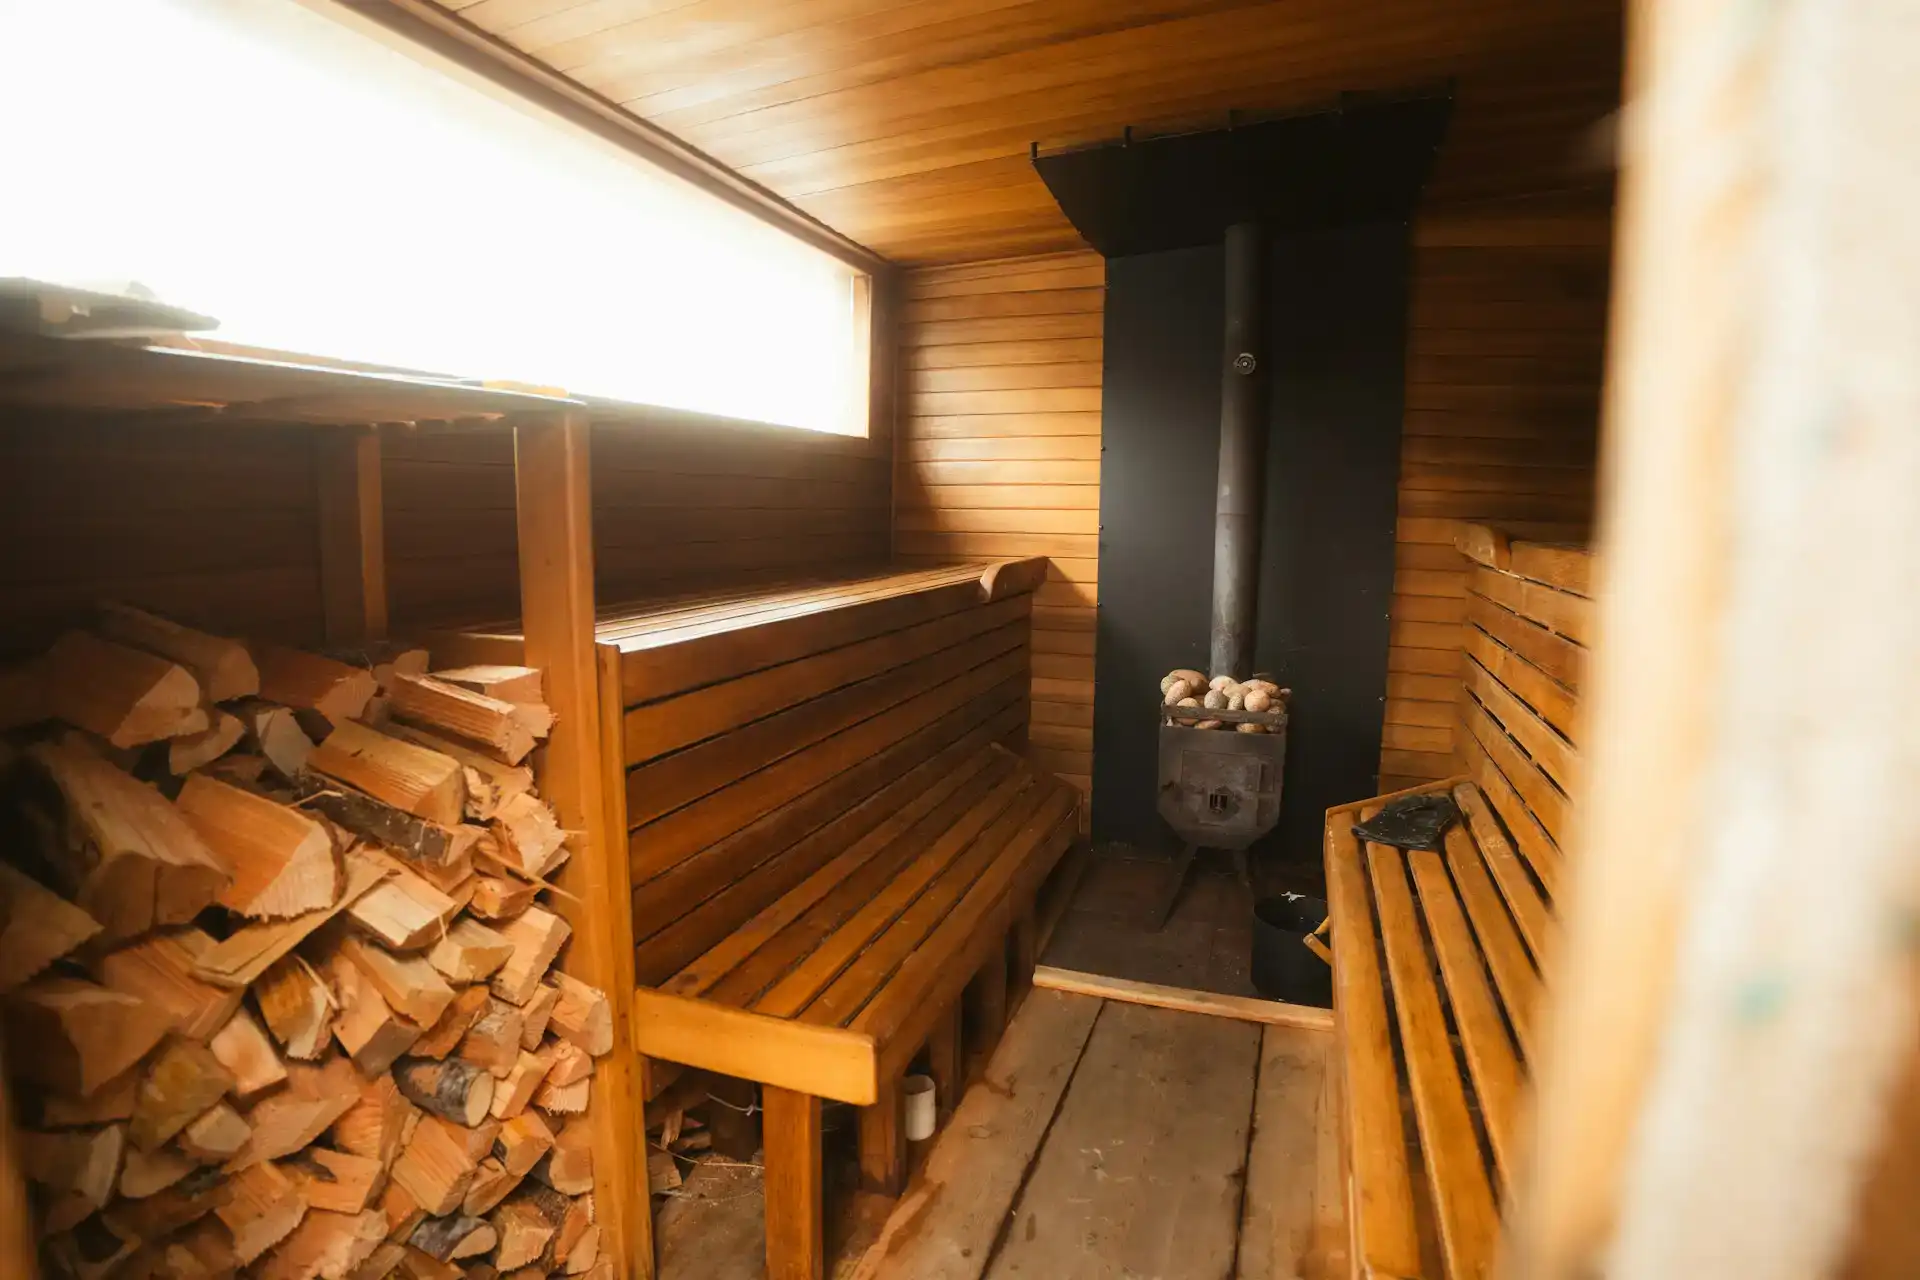
We also factor in sauna heater placement. Heaters need specific safety gaps from wood surfaces. Knowing where the heater goes helps you plan your electrical wiring now. You won’t have to rip open walls later to move a wire.

How the Builder Tool Helps You Choose the Right Sauna Size

The builder tool visualizes critical measurements like ceiling height and bench width to ensure your layout accommodates the desired number of users comfortably.

Picking the right size is the hardest part for most DIYers. Standard sizes vary, and they might not fit your specific area.

Typical dimensions for a single person can be as tight as 4×4 feet. However, a sauna size for 2 people usually needs at least 4×6 feet. If you want a sauna size for 4 people, aim for 6×8 feet or larger.

The minimum size is often dictated by heater safety clearances and the door swing. Our tool prevents you from designing a space that is physically impossible to use.

Ceiling height is vital for efficiency. The target is usually 7 feet. This keeps the heat pocket low, right where you are sitting. If you try to design a 9-foot ceiling, the tool flags it as inefficient.

Width impacts bench comfort too. You need depth for both upper and lower benches. The tool helps you see if you have room for wide benches or if you are forcing a cramped layout.

Custom vs Pre-Built Sauna Kits: What’s the Difference?

Custom sauna kits allow you to specify exact dimensions and layouts, while pre-built kits restrict you to static sizes that often waste space.

Most competitors sell rigid boxes. They offer a fixed menu, like 5×7 or 6×6. If your space is 5.5 feet wide, you lose six inches of usable room.

These companies rarely help with the technical details either. You are left hoping the included heater works for your climate.

Our approach is different. We solve the modular sauna vs custom debate by giving you the best of both worlds. You get the ease of a kit with the fit of a custom build.

We align the vapor barrier, insulation, and heater size to your project. You aren’t buying a product off a shelf. You are designing a system. The builder tool bridges the gap between raw lumber and a prefabricated unit.

How the Builder Tool Helps You Avoid Costly Installation Mistakes

Using the builder tool prevents expensive on-site errors by accounting for framing clearances, door swings, and ventilation paths before construction begins.

Fixing a mistake on paper is free. Fixing it during construction costs money.

Proper clearance is essential for safety. You cannot place wooden benches directly against a heater. The tool guides you toward safe, code-compliant layouts.

Vent placement is another technical detail. You need proper airflow to keep the air fresh and the heater running. The tool helps you understand where intake and exhaust vents should go.

Door swing direction matters for traffic flow. You need to choose between a glass vs wood door and decide which way it opens. A door that hits a wall is a nuisance.

For those building in a cold Canadian climate, insulation is key. The tool ensures your design accounts for necessary thermal barriers. This prevents cold spots. By planning installation space clearance upfront, you avoid the nightmare of walls that don’t fit the room.

Who Should Use the Custom Sauna Builder Tool

The custom sauna builder tool is designed for homeowners, contractors, and DIY enthusiasts who need a verified material list for a precise installation.

This tool isn’t just for experts. It is for anyone who wants their project to succeed.

Homeowners planning basement conversions find it essential. Basements often have odd obstacles like support posts or ductwork. The tool helps you navigate these constraints.

People planning backyard wellness projects use it to visualize the footprint. It helps determine if a 6×8 unit fits on the existing patio slab.

Contractors use it to design client installs fast. It generates a reliable quote and material list, saving hours of manual math.

If you are unsure about electrical requirements or dimensions, this tool is for you. It acts as a technical consultant. It gives you the confidence to move forward.

Frequently Asked Questions About Building Your Own Sauna

Here are answers to the most common questions regarding sizing, layout, and heaters for DIY sauna projects.

What is the standard sauna size for a home? There is no single standard, but a 5×7 foot layout is very common. This size fits 3-4 people comfortably while remaining energy efficient.

How much space do I need to build my own sauna? You need the internal dimensions plus the framing width. Generally, allow for at least 4×4 feet of internal space for a functional, small sauna. Always account for exterior maneuvering room.

Can I customize bench layouts? Yes. You can choose L-shaped, straight, or opposing benches depending on your room width. The layout must allow for safe access to the heater.

Does the builder tool recommend the right heater? Yes. The tool calculates the total cubic volume of the room and selects a heater with the appropriate kW output to heat that specific volume.

Start Your Build With Home Sauna Kits

Home Sauna Kits provides the factory-direct materials and technical guidance you need to turn your custom design into reality.

Building a sauna should be an exciting project, not a stressful one. We aim to bridge the gap between professional construction and DIY accessibility.

By using our builder tool, you eliminate the risk of mismatched parts. You get a material package cut to your specifications, ensuring a smooth assembly.

Stop guessing at dimensions. Don’t rely on generic kits that might not fit your life. Take control of your project today. Use our custom builder tool to design a sauna built for your home, your climate, and your needs.

How to Design a Personalized Sauna That Fits Your Home and Wellness Goals

A personalized sauna is a custom-built wellness space designed to fit your exact available dimensions while utilizing specific heater technology and wood types for your health needs. Unlike pre-fabricated box units, a custom design lets you control the entire environment. This ensures the build fits into your life seamlessly instead of becoming a bulky obstacle in your home. This guide explains how to choose the right materials, plan your layout, and pick the best heater for your project.

What Factors Define a Truly Personalized Sauna?

A personalized sauna is defined by its custom dimensions, specific heater technology, and material choices that align with user preference.

Generic kits usually come in fixed square shapes. These rigid designs often leave awkward gaps or dominate a room. A custom build adapts to the room, rather than forcing the room to work around the sauna.

You gain total control over design elements like:

  • Bench Heights: Adjust levels to match your physical comfort.
  • Door Placement: Optimize the traffic flow in the room.
  • Floor Plans: Utilize every inch of available space.

This attention to detail creates a spa-quality experience in your own house.

Traditional vs. Infrared: Which Heater Suits Your Wellness Goals?

Traditional saunas rely on high heat and steam for deep sweating, whereas infrared saunas use light to heat your body directly at lower temperatures.

The right choice depends entirely on the experience you want. If you enjoy intense heat and the ritual of pouring water on rocks (“löyly”), go with a traditional heater. If you prefer a milder heat that targets muscles without thick, humid air, infrared is the better path.

Benefits of Traditional Steam Saunas

Traditional steam saunas improve circulation and respiratory health by generating high heat and humidity levels that often exceed 180°F.

The sudden rush of steam opens your pores instantly. This style of bathing has supported cardiovascular health for centuries.

You need high-quality components to get this experience right. We always recommend Harvia heaters for their proven reliability. They provide consistent heat and handle the stress of daily thermal cycling without failing.

When to Choose Infrared Technology

Infrared technology is ideal for people who prefer lower temperatures or need relief from specific joint pain that responds well to radiant heat.

These units usually run between 120°F and 140°F. This lower range makes the session much more comfortable if you are sensitive to extreme heat.

Key advantages of infrared setups include:

  • Longer sessions without feeling overheated.
  • Direct heat penetration for muscle recovery.
  • Lower humidity for easier breathing.

What Is the Best Wood for a Custom Sauna Build?

Western Red Cedar is the best wood for custom saunas because of its natural decay resistance, pleasant aroma, and superior thermal properties.

You need wood that won’t warp under heat and moisture stress. Other timber options often degrade quickly in these extreme conditions. Cedar also stays cool to the touch, so it remains comfortable to sit on even when the room is scorching hot.

Why Western Red Cedar Is the Top Choice

Western Red Cedar is the top choice because its cellular structure acts as natural insulation to keep heat inside the sauna.

It offers a rich, beautiful look ranging from amber to deep brown. From a practical standpoint, it is the most durable option for wet environments.

Reasons to choose Cedar include:

  • Natural oils that repel insects and fungi.
  • An iconic scent that helps you relax.
  • Resistance to warping in high humidity.

Alternative Wood Options for Modern Aesthetics

Clear Hemlock is a valid alternative for builders seeking a lighter, more uniform color palette, although it lacks the rot resistance of cedar.

It provides a very modern, clean aesthetic often seen in commercial spas.

However, this wood requires more maintenance. It does not handle moisture as well as cedar. You must ensure your ventilation is flawless to prevent staining or warping if you go this route.

How Do You Plan the Layout for a Small or Awkward Space?

Planning a layout for small spaces involves utilizing corners and custom bench configurations to maximize internal volume.

You don’t need a huge room to have a great sauna. Angled benches can turn a tight corner into a comfortable seat.

Consider these layout strategies:

  • Install a glass door or front panel to reduce the “closed-in” feeling.
  • Use multi-level benches to increase seating capacity.
  • Place the heater on a side wall to open up floor space.

Building a Personalized Sauna in Canada: What You Need to Know

Building a sauna in Canada demands higher-grade insulation and vapor barriers to withstand extreme temperature shifts and prevent moisture damage.

The Canadian climate is unforgiving. A standard build that works in California will fail here. You must account for deep freezes so your heater doesn’t run constantly just to maintain temperature.

Insulation Requirements for Cold Climates

For cold climates, you need insulation with a minimum value of R-12 or higher in the walls and ceiling to retain heat efficiently.

Fiberglass or mineral wool batts are the standard choices here. You must pair this insulation with a foil vapor barrier.

The foil barrier performs two critical tasks:

  • Reflects heat back into the sauna interior.
  • Prevents moisture from seeping into walls and freezing.

Indoor vs. Outdoor Considerations

Indoor builds are generally easier to maintain in Canada, while outdoor builds must be engineered to handle heavy snow loads and sub-zero temperatures.

An indoor sauna benefits from your home’s existing HVAC and insulation envelope. It is always ready to use.

Outdoor units require extra planning:

  • Sloped roofs are necessary to shed snow.
  • Insulated floors are required to stop cold drafts.
  • Exterior finishes must be weather-treated every year.

What Are the Essential Ventilation and Electrical Requirements?

Essential requirements include a dedicated 220V electrical circuit for the heater and properly placed intake and exhaust vents for air circulation.

Most robust heaters cannot run on a standard wall outlet. You need a licensed electrician to install the heavy-duty wire required for safety.

Ventilation ensures the equipment runs correctly:

  • Intake Vent: Place this low on the wall near the heater.
  • Exhaust Vent: Place this high on the opposite wall.
  • Airflow: Prevents the high-limit switch from tripping unnecessarily.

Why Choose Home Sauna Kits & Custom Saunas for Your Project?

We provide the premium lumber, authentic heaters, and expert guidance necessary to build a professional-grade sauna yourself.

At Home Sauna Kits, we bridge the gap between hiring expensive contractors and buying flimsy pre-fab boxes. Our kits give you the exact material quantities you need. You get the satisfaction of building it yourself without the guesswork.

We source only the finest Western Red Cedar and reliable Harvia components. We ensure your project is built to last. Start your build with Home Sauna Kits & Custom Saunas today.

How Do Sauna Kits in Ontario Adapt to Local Climate and Building Codes?

Installing a sauna in Ontario isn’t like setting one up in a place where the weather is warm and dry all year long. The combination of cold winters, humid summers, snow loads, and strict building codes in Ontario is somewhat unique, and therefore, sauna kits require the proper design to be able to withstand these conditions.

That’s why not all sauna kits are created equal.

For homeowners considering sauna kits in Ontario, understanding how these kits adapt to local climate conditions and comply with building codes is essential. A sauna that performs well in theory but fails under real Ontario conditions quickly becomes a headache rather than a wellness upgrade.

Let’s take a closer look at how well-designed sauna kits adapt to Ontario’s environment and regulatory landscape, and why those adaptations matter.

Ontario’s Climate Demands More From Sauna Kits

Ontario has quite dramatic seasonal changes. The winters here are characterized by very low temperatures, snow and ice, while summers tend to be hot and humid. Any sauna kits installed in this area have to be capable of operating efficiently and consistently in the whole range of these conditions.

Key climate challenges include:

  • Sub-zero winter temperatures
  • High humidity during warmer months
  • Freeze-thaw cycles that stress materials
  • Snow load on outdoor structures

Sauna kits that are not designed with these realities in mind often suffer from heat loss, moisture issues, or structural wear over time.

At Home Sauna Kits, sauna systems are built to handle these exact conditions, ensuring year-round usability rather than seasonal compromise.

Insulation That Works in Cold Canadian Winters

One of the most critical adaptations for sauna kits Ontario homeowners use is proper insulation. In colder climates, insulation isn’t optional—it’s essential.

High-quality sauna kits use:

  • Thick wall panels to retain heat
  • Tight-fitting construction to minimize air leaks
  • Materials that maintain performance in cold temperatures

When saunas are not insulated properly, they take longer to warm up, have difficulty staying at the right temperature, and the heaters get extra wear and tear .For example, during the Ontario winters, using the sauna can be a very inefficient way to heat your body or it could simply be uncomfortable.

One of the advantages of well insulated sauna kits is that they provide consistent performance even in freezing temperatures.

Moisture Management for Humid Conditions

Ontario’s humidity presents another challenge. Saunas generate moisture by design, and when combined with external humidity, poor construction can lead to condensation issues.

Sauna kits adapted for Ontario account for moisture by:

  • Using breathable wood materials
  • Allowing controlled airflow
  • Preventing trapped moisture within walls

This balance helps reduce the risk of mold, warping, and long-term material degradation. Proper moisture management ensures the sauna remains healthy, safe, and durable over time.

Material Selection That Handles Temperature Swings

Not all wood performs well in Ontario’s climate. Temperature swings cause expansion and contraction, which can lead to cracking or warping if the wrong materials are used.

Sauna kits designed for Ontario typically use:

  • Low-resin, dimensionally stable wood
  • Materials that tolerate repeated freeze-thaw cycles
  • Woods that resist moisture absorption

These material choices help sauna kits maintain their structural integrity and appearance even after years of seasonal changes.

Heater Compatibility and Electrical Standards

Another major factor when installing sauna kits in Ontario is electrical compatibility. Heaters must meet local electrical standards and operate safely within Canadian regulations.

Properly designed sauna kits account for:

  • CSA or equivalent safety standards
  • Voltage requirements common in Ontario homes
  • Safe heater clearances and ventilation

Using a heater that isn’t suited to local electrical codes can cause delays during inspection or require costly modifications. Sauna kits that align with Ontario standards simplify installation and approval.

Home Sauna Kits focuses on compatibility and safety, helping homeowners avoid common compliance issues.

Adapting Sauna Kits to Ontario Building Codes

Ontario building codes are designed to ensure safety, durability, and proper construction. Sauna kits must align with these requirements to avoid inspection issues or future liability.

Key code-related considerations include:

  • Structural stability
  • Fire safety clearances
  • Electrical compliance
  • Proper ventilation

While building codes vary slightly by municipality, sauna kits designed for Ontario take these requirements into account from the start. This reduces the risk of installation delays or costly adjustments later.

Indoor vs Outdoor Sauna Kit Considerations

Ontario homeowners often choose between indoor and outdoor sauna kits, and each option has its own code and climate considerations.

Indoor Sauna Kits

Indoor sauna kits must integrate with the home’s existing structure and systems. This includes:

  • Electrical access
  • Ventilation planning
  • Moisture control

Well-designed indoor sauna kits are compact, efficient, and easy to integrate into basements, bathrooms, or spare rooms without major renovations.

Outdoor Sauna Kits

Outdoor sauna kits in Ontario face harsher conditions. Snow load, wind exposure, and ground stability all come into play.

Outdoor sauna kits adapted for Ontario typically include:

  • Reinforced roofing
  • Weather-resistant exterior materials
  • Stable framing systems
  • Proper elevation to avoid water damage

These features ensure outdoor saunas remain safe and functional year-round.

Ventilation Designed for Comfort and Compliance

Ventilation plays a dual role in sauna performance. It affects comfort and compliance.

Proper ventilation:

  • Supports even heat distribution
  • Improves air quality inside the sauna
  • Helps manage moisture
  • Aligns with safety expectations

Sauna kits designed for Ontario include ventilation planning as part of the overall system, rather than treating it as an afterthought.

Assembly Designed for Local Conditions

Another adaptation often overlooked is ease of assembly. Ontario weather doesn’t always cooperate, especially for outdoor installations.

Sauna kits built for Ontario:

  • Use precision-cut components
  • Include clear instructions
  • Reduce on-site construction time

This makes installation more manageable, even in colder conditions, and helps ensure the sauna is assembled correctly the first time.

Longevity Through Seasonal Use

A common misconception is that saunas in Ontario are only practical for winter use. In reality, properly designed sauna kits are meant for year-round enjoyment.

Sauna kits adapted for Ontario:

  • Maintain performance in winter
  • Handle summer humidity
  • Require minimal seasonal adjustments

This durability ensures the sauna remains a long-term investment rather than a seasonal feature.

Why Local Adaptation Matters

Choosing sauna kits designed for other climates often leads to problems once they’re installed in Ontario. Poor insulation, incorrect materials, or non-compliant components can shorten lifespan and complicate ownership.

When sauna kits are designed with Ontario’s climate and regulations in mind, homeowners benefit from:

  • Faster installation
  • Fewer compliance issues
  • Better long-term performance
  • Greater peace of mind

At Home Sauna Kits, this local-first approach ensures that sauna kits are practical, reliable, and suited to real Ontario conditions.

Planning Ahead Makes a Difference

Homeowners planning to install a sauna often focus on design first. While design matters, function and compliance matter more in the long run.

Asking the right questions early helps:

  • Avoid permit delays
  • Reduce installation costs
  • Ensure consistent performance

Understanding how sauna kits adapt to Ontario’s climate and codes allows homeowners to make informed decisions with confidence.

How Home Sauna Kits Help You Adapt Your Sauna To Ontario’s Climate

So how do sauna kits in Ontario adapt to local climate and building codes? Through thoughtful insulation, climate-appropriate materials, code-aware design, and practical installation planning.

Ontario’s weather and regulations demand more from sauna kits than milder regions do. When those demands are addressed from the start, sauna ownership becomes simple, safe, and rewarding.

At Home Sauna Kits, sauna systems are designed specifically for Ontario homeowners. This means that every kit will work well through different seasons and comply with local regulations. The outcome is a sauna, which makes you feel right at home instead of a sacrifice.

If you want to have a sauna that is really suitable for Othe ntario lifestyle and you are willing to invest in one, the first step towards an enjoyable, durable experience is to get to know these adaptations.

What Are the Most Common Sauna Replacement Parts You’ll Need and When

Owning a sauna means that you have made a long-term investment in comfort, wellness, and routine. Similar to any other system that runs on heat, electricity, and uses natural materials, a sauna is not something that you can just install once and leave forever. With time, certain parts will inevitably get worn and need to be changed.

It is perfectly fine.

Knowing sauna replacement parts, their function, and when they usually need to be serviced, you can make your sauna remain safe and efficient for several years. The secret is not to refrain from replacements. It is, however, important to understand what to anticipate and to arrange accordingly so that minor problems do not become a major inconvenience.

We shall discuss the most common sauna replacement parts, the reasons for their wear and tear, and how to detect the right time for their replacement.

Why Sauna Parts Eventually Need Replacing

Saunas operate under extreme conditions. High heat, repeated temperature changes, moisture, and regular use all place stress on components over time.

Common factors that lead to replacement include:

  • Heat exposure over long periods
  • Mineral buildup from water on stones
  • Electrical wear from repeated heating cycles
  • Natural aging of wood and mechanical parts

Any sauna, even those of high standard, will at some point require maintenance as well as replacement parts. Realizing this beforehand leads to you protecting your investment and not being surprised by the downtime.

When it comes to relying on Home Sauna Kits for the parts, these parts can be considered an upgrade to your current system due to their high, tech features which make them easy to maintain and more predictable.

Sauna Heating Elements

When Heating Elements Need Replacing

Heating elements are one of the most common sauna replacement parts. They work hard every session, heating up and cooling down repeatedly.

Signs a heating element may need replacement include:

  • The sauna takes much longer to heat up
  • The temperature never reaches the set level
  • Certain areas of the heater don’t get hot
  • The heater trips breakers unexpectedly

On average, heating elements can last several years, depending on the frequency of use and maintenance. Regular cleaning and proper stone placement can extend their lifespan.

Sauna Stones

Why Sauna Stones Wear Out

Sauna stones absorb and radiate heat, creating the smooth, even warmth that defines the sauna experience. Over time, they crack, crumble, or become compacted.

Common signs it’s time to replace sauna stones:

  • Stones are visibly cracked or breaking apart
  • Poor airflow through the heater
  • Uneven or harsh heat
  • Reduced steam when water is applied

Replacing sauna stones every one to two years is common for regularly used saunas. Fresh stones protect heating elements and improve overall performance.

Sauna Control Panels

When Controls Start to Fail

Control panels regulate the temperature, timing, and general functioning of a sauna. As they deal with electrical signals and frequent changes, they may wear out after some time.

Less obvious Signs a control panel may require replacement include:

  • Buttons stop responding
  • Temperature readings are inaccurate
  • The sauna turns off unexpectedly
  • Error codes appear frequently

Replacing a faulty control panel restores reliability and safety, ensuring your sauna behaves exactly as intended.

Temperature Sensors and Thermostats

Small Parts, Big Impact

Temperature sensors and thermostats play a critical role in maintaining consistent heat. When they fail, sauna performance suffers.

You may need to replace sensors if:

  • The sauna overheats or underheats
  • Temperature fluctuates unexpectedly
  • Readings don’t match how the sauna feels

These are relatively small sauna replacement parts, but they have a major impact on comfort and safety.

Sauna Lights and Light Covers

Heat-Resistant Components Wear Over Time

Sauna lighting is made to withstand heat; however, even heat-rated fixtures don’t last indefinitely.

Signs that lighting parts are due for replacement:

  • Lights flicker or quit working
  • Covers turn brittle or crack
  • Moisture accumulates inside the fixtures

Changing the lights and covers brings back the sauna’s atmosphere as well as guarantees electrical safety inside.

Sauna Door Hardware

Hinges, Handles, and Latches

Doors are used every session, making their hardware some of the most frequently stressed parts of a sauna.

Common replacement needs include:

  • Loose or squeaking hinges
  • Handles that become hot to the touch
  • Latches that no longer seal properly

Worn door hardware affects heat retention and safety. Replacing these parts helps maintain proper sealing and ease of use.

Sauna Door Seals and Gaskets

Keeping Heat Where It Belongs

Door seals and gaskets are basically the things that keep heat inside. However, due to constant exposure to heat, they can become hard or even develop cracks.

You may have to change seals when:

  • The heat is escaping around the door
  • The door doesn’t close as tightly as before
  • The seal is hard, dry, and crumbly

Fresh seals are not only good for saving energy but also for giving your heater a rest.

Vent Covers and Airflow Components

Often Overlooked, Always Important

Ventilation parts help regulate airflow and comfort. While they don’t fail as often as heaters or controls, they can degrade or become blocked.

Replacement may be needed if:

  • Vent covers crack or warp
  • Airflow feels restricted
  • Moisture accumulates inside the sauna

Proper ventilation supports both comfort and longevity of other sauna components.

Sauna Benches and Wood Components

Natural Materials Age Gracefully, But Not Forever

Sauna benches and interior wood surfaces experience constant heat and moisture. Over time, wood can dry out, discolor, or develop cracks.

You may consider replacing wood components if:

  • Benches feel rough or splintered
  • Structural support weakens
  • Stains or odors persist despite cleaning

Replacing worn wood parts refreshes both comfort and appearance while maintaining hygiene.

Electrical Wiring and Connections

Safety Comes First

Electrical components are less frequently replaced, but when they fail, they must be addressed immediately.

Signs of electrical issues include:

  • Burning smells
  • Tripped breakers
  • Flickering lights or controls

Any electrical replacement should be handled carefully, following safety standards. Using compatible sauna replacement parts is critical to maintaining safe operation.

How Often Should Sauna Replacement Parts Be Expected?

There’s no single timeline that applies to every sauna, but general patterns do exist.

Typical replacement intervals:

  • Sauna stones: every 1–2 years
  • Heating elements: several years, depending on use
  • Controls and sensors: as needed
  • Lights and seals: as wear becomes visible

Regular inspections help catch issues early, often allowing you to replace parts before they cause larger problems.

Why Using the Right Replacement Parts Matters

However, not all replacement parts can be interchanged. Incompatible parts, if used, not only can performance be hampered, but there may be safety risks, your warranty might get voided, and the damage can even be extended.

Home Sauna Kits only choose sauna replacement parts that perfectly fit specific systems, so that there is no worry about compatibility, and the customers get peace of mind.

Preventive Maintenance Reduces Replacement Frequency

While replacement is inevitable, proper care can significantly extend the life of sauna components.

Good habits include:

  • Rearranging sauna stones periodically
  • Keeping vents clear
  • Cleaning surfaces regularly
  • Avoiding excessive water use on heaters

These small steps reduce stress on components and delay the need for replacement.

Planning Ahead Makes Ownership Easier

The most stress-free sauna owners aren’t those who never replace parts. They’re the ones who expect it and plan for it.

Keeping track of:

  • Installation dates
  • Past replacements
  • Performance changes

makes maintenance predictable rather than reactive.

How You Can Get Sauna Replacement Parts With Home Sauna Kits

Saunas are built to last; however, like any system, they will require maintenance now and then. If you are familiar with the usual sauna replacement parts and the average time for their maintenance, then you can always have a safe, efficient, and great sauna at your disposal.

Heaters, stones, controls, sensors, lighting, and door parts are some of the single components that, not only by themselves but also collectively, contribute to the overall experience. If you maintain and replace them on time, your sauna will continue to perform at its best.

At Home Sauna Kits, replacement parts form an integral part of a long-term sauna ownership plan. Sauna owners who plan and invest in quality parts can look forward to years of hassle-free standard performance.

Knowing what to replace and when doesn’t just protect your sauna. It protects the experience that made you invest in one in the first place.

How Does a Cedar Sauna Bench Enhance Your Sauna Experience?

When people are thinking about renovating or installing a sauna, most of the time they think about the heaters, then some think about the layout, and finally about lighting. The benches come somewhere in between, if not last. They are usually taken for granted, like something that is seriously needed but will not make up the whole definition of the sauna. But if you have spent serious time in a sauna, this is far from being true.

A bench is the place one sits, reclines, relaxes, and stays during the session. The comfort, heat, and overall feeling in the sauna can be pretty dependent on the material the benches are made from, and this is the reason a cedar sauna bench has a far greater role in the actual experience of being in the sauna than most people ever realize. We’re going to discuss how cedar benches add more comfort, durability, and atmosphere to your sauna, and why they’re loved by many sauna owners.

We will talk about how cedar benches increase the comfort, durability, and atmosphere of a sauna, and why they are such a favourite among sauna owners.

Why the Bench Matters More Than You Think

A sauna bench is not just a piece of furniture. It is a functional surface that is exposed to heat, moisture, and frequent use. The sauna experience will be less enjoyable if the bench material is not suitable.

A good bench can be expected to:

  • Remain comfortable even at high temperatures
  • Be resistant to moisture and wear
  • Feels nice against bare skin
  • Allow for long, comfortable sessions

Cedar has become a popular wood for sauna benches because it can live up to all these requirements and more.

Cedar Stays Comfortable Even at High Heat

The first and most visible benefit of having a cedar sauna bench is the comfort that comes from its temperature. The reason cedar is considered a softwood is that its property of low heat conductivity is quite prominent. What this means is that when other materials are hot, cedar doesn’t reach that temperature and doesn’t remain hot either.

In the general application of this principle, it means:

  • Benches don’t get too hot for sitting comfortably, even during long sauna sessions
  • You hardly ever get hot spots or feel uncomfortable
  • The surface feels warm, not burning hot

This is particularly the case with high-temperature saunas, where materials of lower quality quickly become unpleasant to touch.

A Natural Wood That Handles Sauna Conditions Well

Saunas are harsh environments for wood. Constant exposure to heat and humidity causes many materials to warp, crack, or degrade over time.

Cedar performs exceptionally well because it:

  • Handles temperature changes without excessive movement
  • Resists moisture absorption
  • Maintains its structure with regular use

A cedar sauna bench holds up well through repeated heating and cooling cycles, making it a reliable long-term choice rather than a short-term solution.

Cedar’s Resistance to Moisture and Odors

It is quite natural to have moisture in a sauna since most people there enjoy steam or pouring water onto the hot stones. If the material that a bench is made of is not fit for such an environment, over time, this may lead to the appearance of unpleasant smells from the benches or to hygienic issues.

The wood of the cedar naturally resists the accumulation of moisture and further prevents the development of odors. You will feel fresh, not musty, even when the sauna is in rather frequent use.

For sauna owners, this means:

  • Less odor retention
  • Easier cleaning
  • A more hygienic seating surface

At Home Sauna Kits, cedar benches are selected specifically for these practical benefits, not just appearance.

Comfort That Supports Relaxation

Temperature is just one aspect that affects the physical comfort of a cedar sauna bench. Besides that, the cedar wood has a naturally smooth texture and a bit of cushioning; thus, it is nice and gentle to the skin.

This is a big help, especially for people:

  • Who takes long sauna sessions
  • Users who like to recline or lean back
  • People with sensitive skin

If the benches are rough or are hardly finished, it may be a problem for a person’s complete relaxation. A well-finished cedar bench is capable of giving a person comfort without being a source of distraction.

The Subtle Sensory Experience of Cedar

Cedar brings more than just physical comfort. Its natural aroma adds to the overall sauna experience in a subtle, calming way.

The scent of cedar is:

  • Light and natural
  • Never overpowering
  • Often associated with relaxation

This sensory element contributes to the atmosphere of the sauna without requiring artificial fragrances or enhancements. It’s part of what makes cedar saunas feel grounded and authentic.

Cedar Supports Traditional Sauna Design

Cedar has been the material of choice for traditional sauna building for the longest time. It is not only practical, but also the use of cedar has become a part of culture.

A bench in a cedar sauna:

  • Seems to be a classic and not a fad
  • Can integrate with both modern and traditional sauna designs
  • Visually, it gives more warmth to the space

Cedar, for many who own a sauna, is the element that makes a sauna appear to be a deliberate and well-thought-out project rather than something that was thrown together.

Durability Without Feeling Industrial

Some materials last a long time but sacrifice comfort or aesthetics in the process. Cedar manages to offer durability without feeling cold or industrial.

With proper care, a cedar sauna bench:

  • Maintains its appearance over time
  • Ages gracefully rather than deteriorating
  • Can be refreshed with light maintenance

This balance makes cedar a smart investment for sauna owners who want longevity without compromising experience.

Easy Maintenance for Long-Term Use

Maintenance plays a role in how enjoyable sauna ownership feels. A cedar sauna bench is relatively easy to care for, which encourages regular use rather than avoidance.

Basic maintenance typically includes:

  • Occasional light cleaning
  • Allowing the bench to dry between sessions
  • Gentle sanding if the surface becomes rough over time

These simple steps help keep the bench comfortable and inviting for years.

Supporting Better Heat Distribution and Airflow

Bench design and material influence how heat circulates within the sauna. Cedar benches are often designed with spacing that allows air to flow naturally.

This supports:

  • Even heat distribution
  • Improved comfort at different seating levels
  • A more balanced sauna environment

A well-positioned cedar sauna bench enhances how the sauna feels, not just how it looks.

A Practical Upgrade That Makes a Big Difference

Many sauna upgrades are technical or costly. A cedar sauna bench is a practical improvement that has an immediate impact on comfort and enjoyment.

For sauna owners upgrading or replacing benches, cedar offers:

  • A noticeable improvement in comfort
  • Long-term durability
  • A natural, high-quality feel

At Home Sauna Kits, cedar benches are designed to integrate easily into existing sauna setups, making upgrades straightforward.

Why Cedar Is a Favorite Among Sauna Owners

Over time, sauna owners often develop strong preferences based on real experience. Cedar continues to be a favorite because it consistently delivers where it matters.

People choose cedar because:

  • It feels good during use
  • It lasts under sauna conditions
  • It enhances the atmosphere of the space

These benefits aren’t theoretical. They’re noticed session after session.

How You Can Get Cedar Sauna Bench at Home Saunas

A sauna is far more than a space blast, heated to a very high temperature. It is a meticulously planned comfort, stability, and wellness-oriented experience. The seat is a big part of the enjoyment, which is why the kind of material used is so crucial.

The cedar sauna bench has this certain quality. It is not only pleasing to the senses but also has this warmth that you would feel no matter how high the temperature. And on top of it all, it resists moisture and aromas. The entire environment that it creates is one of peace and temptation. It will help you stay longer in it since it can age well and needs little maintenance. upkeep.

At Home Sauna Kits, cedar sauna benches are chosen for these exact reasons. They aren’t just functional components. They’re part of what makes a sauna feel complete.

When the bench is comfortable, everything else falls into place.

How Do Outdoor Sauna Kits in Canada Withstand Harsh Winters?

As a native Canadian or someone who has lived in Canada for a long time, you must be familiar with the severe climatic conditions. Very often it gets below zero, it snows heavily, the wind blows strongly, and the cold season is long. That’s the reason every outdoor structure has to be made of sturdy materials, and the sauna has to follow the same rule.

This raises the question of how outdoor sauna kits perform in cold weather, a matter of great interest not only for homeowners but also for wellness enthusiasts. 

The truth is that, when properly designed s outdoor sauna kits in Canada cannot only withstand very low temperatures but may even be used more efficiently during the cold season. This can be attributed to several factors, such as the design features that matter most and the importance of selecting a suitable kit. 

We at Home Sauna Kits know that Canadian clients need outdoor sauna kits that can withstand cold weather, so we are delivering exactly what they require. Besides, what is the benefit of an outdoor sauna in Canada? 

Why Outdoor Saunas Are a Good Idea in Canada

The first thing that might come to mind is that putting a sauna outside in a cold place doesn’t make sense. Nevertheless, it is actually in winter that the sauna becomes the most useful. The alternation between the cold but fresh air and the intense heat of the sauna stimulates blood circulation, helps the body relax, and gives a general feeling of well-being.

Outdoor saunas are standard in cold areas for several reasons:

  • Cold air is an excellent insulator for a sauna. 
  • Snow and cold air are perfect for cooling your body after a sauna session. 
  • Being outside prevents moisture from entering the house. 
  • A winter sauna gives you a more engaging and rejuvenating experience.

Therefore, outdoor sauna kits in Canada are specifically designed to withstand the most challenging conditions rather than be at odds with them.

Insulation: The Main Factor in Winter Performance

Insulation is the most crucial factor affecting a sauna’s performance in winter. A top-quality outdoor sauna kit is constructed of thick, close-fitting panels that retain heat even when the temperatures outdoors are very low.

Proper insulation ensures:

  • Heating times are shorter, even if the weather is cold.
  • The temperatures inside can be kept stable
  • Energy consumption is lowered
  • Less damage is done to the heater

If insulation is carried out correctly, the temperature outside will hardly affect the temperature inside a sauna. This is one of the significant reasons why specially designed kits from Home Sauna Kits perform better than randomly constructed or DIY ones.

Wood Choices and Cold Weather Durability

Even the best wood might not withstand Canadian winters if it is not the right type. Outdoor sauna kits for cold climates are made of moisture-, crack-, and warp-resistant wood. 

The wood used in a winter sauna is generally characterized by: 

  • Low resin content.
  • Being resistant to rot and mould.
  • The capability to expand and contract without breaking.

Such features enable outdoor sauna kits in Canada to undergo repeated freezing and thawing cycles without losing structural integrity, even after prolonged use. 

How Sauna Heaters Perform in Extreme Cold

One of the questions often asked is whether sauna heaters can operate normally in freezing weather. If the sauna is built correctly, outside cold air will not cause poor heater performance. 

In fact: 

  • Cold air improves efficiency in wood-burning heaters
  • Electric heaters are designed to reach target temperatures regardless of outside conditions
  • Proper sealing is essential for retaining heat

With the right heater size and an insulated structure, outdoor sauna kits in Canada can reach ideal sauna temperatures even in deep winter.

Snow Load and Structural Strength

Heavy snow is the other problem of Canadian winters. The outdoor sauna kits intended for Canadian conditions address snow load by featuring strengthened roofs and robust frames. 

Good quality sauna kits generally possess:

  • Either sloping or strengthening of the roofs so that the snow can fall off
  • Panels that can hold the weight of the snow on the roof during the winter
  • Fasteners that are firmly secured and capable of withstanding even the cold weather

Such characteristics make the sauna a safe and usable place throughout the whole winter.

Moisture Control in Freezing Conditions

Managing moisture is critical in cold climates. Steam inside the sauna, combined with freezing outdoor air, can cause condensation issues if the sauna is poorly built.

High-quality outdoor sauna kits address this by:

  • Using breathable wood materials
  • Allowing proper airflow and ventilation
  • Preventing moisture from being trapped inside wall structures

This balance helps prevent mold growth, ice buildup, and long-term structural damage, problems commonly found in poorly constructed outdoor structures.

Installation and Placement in Winter Environments

Another advantage of outdoor sauna kits is that they are designed for easier installation. Clear instructions, precision-cut components, and proper sealing allow for assembly even in colder regions.

Placement also plays an important role:

  • Raised bases protect against snowmelt.
  • Sheltered locations reduce wind exposure.
  • Proper ground preparation improves overall stability.

Choosing a kit specifically designed for outdoor use ensures these considerations are already built in.

Performance Through Seasonal Use

A common misconception is that outdoor saunas are only suitable for seasonal use. In reality, outdoor sauna kits in Canada are often used year-round, with winter being the most popular season.

When properly maintained, these kits:

  • Maintain their structural integrity through temperature changes.
  • Require minimal winter-specific adjustments.
  • Deliver consistent performance over time.

In most cases, regular cleaning, basic inspections, and routine heater maintenance are sufficient.

Not all outdoor sauna kits are the same. Kits designed for mild climates may struggle during Canadian winters, while those engineered for cold regions perform reliably.

Choosing a supplier that understands winter conditions is essential. At Home Sauna Kits’ outdoor sauna kits are designed with insulation, materials, and structural features suitable for harsh climates, ensuring comfort, reliability, and long-term value.

Final Thoughts

So, how do outdoor sauna kits in Canada withstand harsh winters? When appropriately designed, they do more than survive; they excel. With proper insulation, durable materials, a strong structural design, and reliable heaters, outdoor saunas are well-suited to Canadian conditions.

For homeowners looking to invest in a sauna that performs year after year through snow and sub-zero temperatures, choosing a winter-ready outdoor sauna kit is key. Explore our Home Sauna Kits to explore high-quality outdoor sauna kits in Canada and enjoy the sauna experience no matter how cold it gets outside.

Health Benefits of Regular Sauna Use

Many individuals are unaware of how frequent sauna use can provide a range of health benefits. As a matter of fact, saunas are no longer simply regarded as a luxury or a traditional practice. They have become a must-have component of modern wellness circuits, adopted by athletes, wellness enthusiasts, and ordinary people seeking to be healthier and more balanced.

Frequent sauna use is linked to a wide range of physical and mental benefits, including stress relief and faster muscle recovery. There was a time when it was considered a luxury only, but it has now become one of the most effective ways to maintain health in general. A sauna is capable of recharging the body and making your life healthier if it is followed after a gym session, while you are recovering from a stressful day, or as a personal care ritual.

Stress Relief That Feels Real

Stress relief can be listed among the most immediate and direct interaction benefits of a sauna session. The heat totally relaxes the body; thus, it goes down to the muscles and the nervous system, releasing the tightly held tension.

When the body becomes warm, muscles relax naturally. The heart rate is increased slowly and in a very lovely, under control manner. The production of stress hormones is decreased, allowing the body to transition into a calmer state.

After a session, a lot of users write that they feel lighter, more transparent, and more grounded, thus demonstrating that frequent sauna use can be one of the main ways of managing stress in your everyday life.

Improved Circulation and Heart Health

Using a sauna can cause a mild increase in heart rate, similar to that from light cardio exercises. Blood vessels dilate with heat, so circulation improves throughout the body.

The supply of oxygen to muscles and tissues also becomes very efficient. The transport of nutrients is improved, thus the body is recharged after physical activity. This improved circulation leads to recovery and helps the body to be energetic throughout the day.

Sauna sessions may be used as a fitness routine completer or to improve cardiovascular health in a relaxed manner. People who are not engaged in regular exercise can use a sauna as a gentle method to stimulate the heart and blood vessels.

Muscle Recovery and Pain Relief

Muscle recovery is one of the most talked‑about benefits of sauna use. Heat helps reduce stiffness, ease soreness, and improve flexibility.

  • After intense exercise, sauna sessions relieve tension and speed recovery.
  • Non‑athletes also benefit, since heat alleviates discomfort from sitting, standing, or repetitive movements.
  • Saunas support both active and inactive lifestyles by reducing everyday aches.

Supporting Detox Through Sweat

The body has natural detox systems, but sweat is still a great way to get rid of toxins. A regular sauna session is arguably the healthiest, most skin-friendly thing to do, as it assures an extreme, uninterrupted sweat, and the skin is left feeling lovely and fresh.

Perspiring makes the skin more ventilated, and impurities that have accumulated in the skin are removed. The skin turns to be flawless and radiant as the process is there to continually get rid of the extra salts and toxins that have built up in the body.

Almost everyone who has used a sauna says it is rejuvenating and energising not only for the body but also for the mind. Intense sweating is sometimes called a restart, as it gives one a feeling of lightness and increased energy.

Skin Health Benefits

Saunas, apart from being just a place where you stay, are a powerful tool in the beauty war for radiant skin. When you go into the hot room, your body reacts by upping the circulation, thus more oxygen and nutrients are delivered to the skin. Better blood flow is like a rev of the body’s natural renewal system, hence your skin begins to repair itself at a faster rate and gets a very hygienic shine.

Regularity is the main point: skin can gradually be transformed by frequent sauna sessions as it becomes softer and more hydrated. On top of that, the heat is beneficial to collagen production, which is a vital protein that keeps the skin elastic and firm.

Consuming ample water and moisturising are essential to replace moisture lost through sweating. Giving your body water back and using a sauna with a nice skincare routine will bring you to the highest level of your sauna session’s benefits.

Consider it a complete cycle: a sauna cleanses and energises your skin, thereby preparing it, while hydration and topical products finish the job.

Better Sleep Quality

Many people who use saunas claim that their sleep improves after regular sauna sessions. 

  • Relaxation and less muscle tension are signs for the body that it is time to sleep. 
  • The slow cooldown after a sauna is one way it helps you get deeper sleep. 

People who have trouble sleeping can use evening sessions to fall asleep faster and also keep their sleep pattern regular.

Mental Clarity and Mood Support

Beyond their physiological benefits, saunas are also an excellent tool for improving people’s mental health. A quiet, interruption-free, free environment is a perfect way for a person to practice self-love.

Sauna use helps with mental clarity and emotional equilibrium, as it is always a calm place to return to and get reenergized, thus feeling more balanced in daily life.

Many individuals view the sauna as their haven, a place to pause, reflect, and reconnect with their inner self. Such mental sharpness may even extend to one’s daily routine, thereby improving concentration and productivity.

Building a Consistent Wellness Habit

The most significant advantages of a sauna are only possible through frequent use. A session in a sauna may be nice once in a while, but the benefits can only be felt after a long period when using a sauna becomes a daily habit. Frequent sauna use is an excellent complement to one’s self-care and relaxation regimes. It enables an individual to maintain a balanced lifestyle and has a daily positive impact on their routine.

As a result of a growing trend, more people are making sauna sessions part of their daily or weekly wellness routines. Therefore, they understand that they can only receive the full benefits through continuous use.

Benefits of a Home Sauna Kit

When you have a sauna at home, you are free from the typical obstacles that are usually associated with the time you spend on your transfer, waiting, and dependence on external facilities. Regular access from home is the best way to keep up with frequent use, and it is also more comfortable and convenient. Longevity is the main factor behind a sauna’s health benefits, as people usually use it more when it is readily available.

Sauna kits for the home are an excellent solution for owning a sauna, and they are both feasible and reasonable for everyday wellness. A home sauna makes people so flexible in using its benefits that they simply turn it into a lifestyle rather than occasionally indulging in it.

Final Thoughts

Going out of your way for a sauna is not just a simple pleasure, but rather a health, energy, and overall well-being investment. One by one, tension is relieved, muscle recovery is accelerated, blood flow is improved, sleep quality is enhanced, and even mental focus is sharpened. These are not just extra things to have; they are, in fact, the very foundation of a balanced energetic lifestyle.

It is difficult to picture these benefits not at a luxurious spa or gym but rather in the comfort of your own home. At Home Sauna Kits, we are committed to providing you with the means to bring this wellness ritual to the next level right into your daily routine. These kits come with installation instructions that require minimal effort and are of high quality; thus, you can use sauna therapy’s healing power whenever you want.

The changes are so powerful that one might be left speechless: skin that is more revitalised and glowing, relaxation that is purposeful, recovery that is getting stronger, and even the inner glow, which becomes apparent, is there. Having a sauna of your own is not just about adding a new feature to your house, but rather about making a place for health and refreshment that, eventually, will be yours.

Enhance your well-being. Be mindful of your health. Work with Home Sauna Kits to build your own haven and enjoy the best sauna therapy experience right at your place.

What Should You Look for When Choosing Sauna Kits in Canada

Sauna Kits in Canada

Choosing sauna kits Canada requires evaluating wood quality, heater options, size requirements, assembly complexity, and climate considerations.

Premium cedar and hemlock materials provide durability for Canadian weather conditions.

Understanding electric versus wood-burning heaters, proper insulation standards, and DIY assembly requirements helps homeowners make informed decisions. Quality sauna kits Canada combine authentic Finnish design with materials suited for harsh winter temperatures and humidity fluctuations.

Choosing sauna kits Canada requires careful consideration of materials, climate factors, and installation requirements.

The right sauna kit delivers decades of relaxation while withstanding harsh Canadian winters.

This guide examines essential factors for selecting sauna kits Canada, from wood types that resist rot and warping to heaters designed for Canadian electrical standards.

Whether installing an indoor retreat or outdoor sanctuary, understanding these elements ensures your investment delivers authentic sauna experiences for years.

How Wood Type and Quality Determine Sauna Longevity in Canadian Climates

Wood selection directly impacts how sauna kits Canada perform through temperature extremes and moisture exposure.

Canadian cedar and hemlock dominate the market for their natural resistance to rot, warping, and insect damage.

Clear-grade versus knotty options affect both appearance and durability. Understanding wood characteristics helps homeowners choose materials that withstand harsh winters while maintaining structural integrity and aromatic properties throughout decades of use.

Why Canadian Cedar and Hemlock Excel in Sauna Construction

Canadian Western Red Cedar stands out for its natural oils that repel moisture and prevent decay.

When heated, cedar releases a pleasant aromatic scent that enhances the relaxation experience.

Hemlock provides an excellent alternative for individuals sensitive to strong wood aromas.

This hypoallergenic wood contains minimal resin, eliminating the sticky residue and fumes that higher-resin woods produce when heated.

Both wood types resist warping through Canadian temperature fluctuations between -30°C winters and +30°C summers.

The dimensional stability prevents gaps from forming between panels as moisture levels change seasonally.

  • Cedar offers natural antibacterial properties and pleasant aroma when heated
  • Hemlock provides hypoallergenic option for sensitive individuals
  • Both woods resist warping through temperature fluctuations
  • Natural oils in cedar repel moisture and prevent decay
  • Hemlock maintains dimensional stability better than softwoods

Proper wood selection prevents costly repairs and premature replacement.

Investing in quality Canadian cedar or hemlock for your sauna kits Canada ensures structural integrity survives decades of use.

What Clear-Grade Versus Knotty Wood Means for Performance

Clear-grade wood features minimal visible knots and uniform grain patterns.

This premium option delivers consistent appearance throughout wall and bench surfaces.

Knotty wood offers rustic character at a more accessible price point.

The visible knots create natural patterns that many homeowners find appealing. This option reduces material costs by 20-30% compared to clear-grade alternatives.

However, knots can become stress points under extreme temperature cycling.

  • Clear-grade provides uniform appearance and consistent heat distribution
  • Knotty wood offers character at lower price point
  • Knots can become weak points under extreme temperature stress
  • Clear-grade recommended for benches and high-contact surfaces
  • Knotty acceptable for walls where structural demands are lower

Match wood grade to your budget priorities and intended use.

Benches and backrests benefit from clear-grade materials where users make direct contact.

Which Heater Type Best Suits Canadian Electrical Standards and Climate Needs

Heater selection impacts operating costs, heating speed, and authentic sauna experience.

Sauna kits Canada typically accommodate electric or wood-burning heaters, each with distinct advantages for Canadian conditions.

Electric heaters offer precise temperature control and easier installation following Canadian electrical codes.

Wood-burning options provide traditional experience and independence from power during winter storms. Matching heater capacity to sauna size ensures efficient performance through cold Canadian winters.

How Electric Heaters Meet Canadian Safety and Efficiency Requirements

CSA certification ensures electric heaters meet Canadian safety standards for residential installation.

This approval verifies proper insulation, temperature controls, and automatic shut-off features. Only purchase heaters displaying CSA marks for legal compliance and insurance coverage.

Canadian homes typically operate on 240V electrical systems for major appliances.

Sauna heaters designed for this voltage heat faster and more efficiently than 120V alternatives.

Digital controls maintain precise temperature settings between 65°C and 90°C.

Modern units include programmable timers that allow pre-heating before use. Remote controls and smartphone apps add convenience for tech-savvy users.

  • CSA-certified heaters meet Canadian safety standards
  • 240V operation provides faster heating than 120V alternatives
  • Digital controls maintain precise temperature settings
  • Built-in timers allow pre-heating before use
  • No ventilation or chimney requirements simplify installation

Calculate proper heater size using the 1 kW per 45-50 cubic feet guideline.

A 6x7x7 foot sauna (294 cubic feet) requires approximately 6kW heater capacity.

When Wood-Burning Heaters Provide Advantages for Canadian Properties

Wood-burning heaters achieve temperatures of 100°C or higher for traditional Finnish sauna experiences.

The intense dry heat creates the authentic löyly that electric heaters struggle to replicate.

Independence from electrical grids proves valuable during Canadian winter power outages.

Ice storms and heavy snow regularly disrupt electricity in rural areas. A wood-burning sauna continues operating regardless of grid status.

However, proper venting requires chimney installation through roof structures.

Building codes mandate specific clearances from combustible materials. Professional installation ensures compliance with municipal regulations and insurance requirements.

Municipal permits may be necessary before outdoor installation.

  • Achieves higher temperatures than electric alternatives
  • Operates during power outages common in Canadian winters
  • Creates authentic Finnish sauna atmosphere with wood smoke aroma
  • Requires proper chimney installation and clearances
  • May need municipal permits for outdoor installation

Rural properties benefit most from wood-burning options where firewood accessibility and distance from neighbors minimize restrictions.

What Size and Layout Configurations Work for Canadian Homes and Properties

Proper sizing ensures comfortable capacity without wasting space or energy.

Sauna kits in Canada range from compact two-person units to spacious family-sized rooms.

Indoor installations require existing room dimensions or basement space, while outdoor kits need level foundations that withstand frost heave.

Ceiling height, door placement, and bench configuration affect comfort and heat circulation. Canadian building codes may dictate minimum clearances and ventilation requirements for safe operation.

How to Calculate Required Space for Different Capacity Needs

Allocate 2-3 feet of bench length per person for comfortable seating capacity.

Two-person saunas function well in 4×5-foot interior dimensions.

This compact size fits basement corners or spare bedrooms without consuming excessive space.

Four-person capacity typically requires 6×7-foot interior dimensions for comfortable use.

This mid-size option accommodates families or couples who prefer more personal space.

Ceiling height of 7 feet allows proper heat stratification and comfortable headroom.

Hot air rises naturally, creating the warmest environment at head level on upper benches.

Account for heater clearances specified by manufacturers—typically 6-12 inches from combustible walls.

  • Two-person saunas require a minimum of 4×5 feet interior dimensions
  • Four-person capacity needs approximately 6×7 feet
  • Seven-foot ceiling height allows proper heat circulation
  • Account for heater clearances (6-12 inches from walls)
  • Door swing requires additional clearance outside the sauna footprint

Measure existing spaces accurately before ordering your sauna kits in Canada.

Which Indoor Versus Outdoor Placement Options Suit Canadian Properties

Indoor saunas utilize existing basement or spare room spaces without weatherproofing concerns. Basements provide natural temperature stability and easy access to electrical panels.

Year-round accessibility without venturing into -30°C winter temperatures appeals to many Canadians.

Outdoor kits require concrete pads or deck platforms installed below frost lines.

Canadian frost depths reach 4-6 feet in most regions, requiring substantial foundation work. Dedicated outdoor space separates sauna activities from main living areas. This isolation prevents humidity concerns in homes and creates a retreat atmosphere.

Winter operation remains viable with proper insulation and heater sizing.

  • Indoor saunas utilize existing basement or spare room spaces
  • Outdoor kits require concrete pads or deck platforms above frost line
  • Year-round outdoor use possible in Canadian winters with proper insulation
  • Indoor placement avoids exposure to harsh weather elements
  • Outdoor saunas provide separate retreat space from main home

Evaluate your property layout and personal preferences when choosing placement.

Why Assembly Complexity and Installation Requirements Matter for DIY Success

Installation complexity varies significantly across sauna kits Canada offerings. Precut modular kits with tongue-and-groove panels simplify assembly for DIY enthusiasts, while custom-cut kits require more carpentry skill.

Electrical work typically needs licensed professionals to meet Canadian codes.

Understanding included components versus separate purchases prevents project delays. Quality manufacturers provide detailed instructions, support, and all necessary hardware for successful installation within weekend timeframes.

What Components Come Standard Versus Requiring Separate Purchase

Comprehensive kits include precut wall panels with integrated vapor barriers and insulation.

Tongue-and-groove cedar or hemlock pieces fit together without gaps, creating airtight rooms that retain heat efficiently.

Benches, backrests, and interior flooring typically ship as part of complete packages. Doors come pre-hung in frames with tempered glass or solid wood options.

However, heaters often require a separate purchase to allow customer choice.

This flexibility lets buyers select electric or wood-burning options and appropriate capacity for their specific sauna size. Electrical components, including wiring, breakers, and junction boxes, need separate procurement.

Licensed electricians specify proper gauge wire and breaker sizes based on heater wattage.

  • Complete kits include precut wall panels with insulation
  • Benches, backrests, and flooring are typically included
  • Heaters are often sold separately to allow customer choice
  • Electrical wiring and breakers require a separate purchase
  • Accessories like buckets, ladles, and thermometers may be optional

Verify complete component lists before ordering your sauna kits in Canada.

How Installation Timelines and Skill Requirements Affect Project Success

Modular panel systems assemble in 6-8 hours with two people and basic tools.

Tongue-and-groove panels snap together like large puzzle pieces. Cordless drills, levels, and tape measures handle most assembly tasks.

Video instructions and illustrated manuals guide each assembly step.

Many manufacturers provide online resources, including troubleshooting guides and customer support phone lines.

Electrical connections require licensed electricians to meet Canadian building codes.

Heater installations involve high-voltage wiring that poses shock and fire hazards if improperly executed.

Outdoor installations demand foundation preparation before kit assembly begins.

Some manufacturers offer installation services for additional fees.

  • Modular panel systems assemble in 6-8 hours with basic tools
  • Electrical connections require a licensed electrician
  • Outdoor installations need foundation preparation
  • Video instructions and phone support reduce complications
  • Some manufacturers offer installation services for an additional cost

Assess your capabilities realistically before committing to DIY installation.

How Home Sauna Kits Delivers Premium DIY Solutions Since 1974

At Home Sauna Kits, we have been serving Canadian sauna enthusiasts since 1974, pioneering the DIY sauna kit concept in North America. Our founder, born in Finland and raised in Canada, brought the authentic Finnish sauna tradition to North American homes.

Over 65,000 customers have installed our sauna kits in Canada across 28 countries.

We provide the most comprehensive selection of sauna kits in Canada offering with fully customizable plans suited for Canadian homes and climates. Our kits include premium Canadian Western Red Cedar or hemlock materials specifically selected for durability in extreme temperature conditions.

From compact indoor installations to spacious outdoor retreats, we manufacture quality components in our Kitchener, Ontario facility at 271 Shoemaker St, Unit #2.

Every sauna kit includes detailed building instructions, all necessary materials, and expert support from our knowledgeable team. We offer CSA-certified electric heaters meeting Canadian electrical standards in capacities from 4kW to 12kW.

Wood-burning options provide traditional experiences for those seeking authentic Finnish sauna rituals.

We understand that creating your dream sauna extends beyond structure alone.

That’s why we provide The Complete Sauna Building Book, written by our founder recognized as a sauna industry pioneer. This comprehensive guide ships free with coupons worth up to $150 in savings on accessories and upgrades.

Contact us at 1-800-519-5753 or email info@homesaunakits.com to discuss your specific requirements with experts who have been building quality sauna kits Canada for five decades.

Clear the Steam – How to Clean a Sauna?

A clean sauna is essential for both your wellness routine and the longevity of your investment. Whether you have an indoor sauna for daily rejuvenation or an outdoor sauna for weekend retreats, proper maintenance ensures your space remains a sanctuary of health and relaxation. Each component requires specific care to function at its best, from cedar walls to sauna benches, electric heaters, and ventilation systems.

Quick Reference Guide

Cleaning Frequency Based on Usage:

  • Weekly (20-30 minutes): Quick wipe-down of benches and sweeping of floors
  • Monthly/Quarterly (1-2 hours): Deep cleaning of heater, shuffling of rocks, inspection of lumber
  • Annually (2-3 hours): Comprehensive maintenance check, washing the rocks, and deep clean

Essential Cleaning Supplies You Will Need

Soft Brush and Clean Cloths

A soft brush is recommended for gently scrubbing wooden or stainless steel surfaces without causing scratches or damage. Pair this with clean, absorbent cloths to effectively wipe down surfaces and absorb excess moisture after cleaning.

Mild Detergent

A damp cloth will be enough for most cleaning jobs. For tougher jobs, choose a mild detergent that’s safe for wood to avoid stripping the natural oils and finish from the sauna surfaces. A gentle formula confirms your sauna remains in good condition without harsh chemical residues.

Specialized Sauna Cleaner

Consider using a specialized sauna cleaner designed specifically for wooden structures. These products can effectively clean while protecting the wood’s integrity. They often contain natural ingredients that help preserve the wood’s appearance and aroma. Make sure you do your research first, to ensure the product is formulated for use in a sauna, and does not off-gas with the heat.

Eco-Friendly Cleaners

Opt for environmentally friendly cleaning solutions to maintain a chemical-free environment inside your sauna. These solutions are often biodegradable and non-toxic, ensuring users’ safety and health. Nothing is more eco-friendly than using a bucket of warm water.

Bucket and Warm Water

The most common tool for cleaning your sauna will be a bucket filled with warm water. If necessary, you can mix cleaning solutions into this, and rinse cloths during the cleaning process. Warm water helps loosen dirt and stains, making cleaning more effective.

⚠️ SAFETY WARNING!

Never use:

  • Bleach or chlorine-based cleaners
  • Ammonia products
  • Harsh chemical cleaners
  • Abrasive scrubbers

Sauna Maintenance Checklist

FrequencyTaskTools NeededNotes
Weekly (Or After Each Use)
Wipe benches and backrestsMicrofiber cloth, cleaning solutionUse gentle wood cleaner
Sweep/vacuum floorSoft broom/vacuumRemove visible debris
Ventilate spaceNoneLeave door & vents open
Empty water containersNonePrevent moisture buildup
Monthly
Full surface cleaningWood cleaner, soft brushFollow the wood grain pattern
Glass/mirror cleaningNon-abrasive glass cleanerAvoid drips on wood
Deep floor moppingWood-safe mop, cleanerEnsure thorough drying
Ventilation checkFlashlightCheck that all vents are clear
Heater inspectionCleaning tools, glovesMust be cool & breaker shut off
Stone cleaning/rotationLarge basin, waterAllow 24hrs to dry
Seal inspectionFlashlightCheck all door seals
Annually
Wood treatmentWood oil, applicatorFollow the wood grain pattern
Electrical safety checkProfessional serviceLicensed technician
Deep stone cleaningHot WaterRemove damaged rocks
Structural inspectionInspection toolsCheck joints/corners

Important Notes:

  • Always ensure the sauna is cool before cleaning
  • Disconnect or turn the breaker off before inspecting the heater
  • Use only approved cleaning products
  • Test all cleaning products on a spare piece of cedar to ensure it does not discolour the wood

Preparing Your Sauna for Cleaning

Begin by turning off and allowing your outdoor or indoor sauna to fully cool. Disconnect or turn off the breaker for the heater. This is important for safety and to avoid damage when cleaning. Remove any items, such as towels or buckets, and establish that you have good lighting so that you can see all areas clearly.

Cleaning the Sauna Interior

Cleaning the interior of your sauna is essential for maintaining its aesthetic appeal and ensuring a hygienic environment. By following a structured cleaning routine, you can preserve the natural beauty of its wooden surfaces while ensuring a safe and enjoyable experience for every session. 

1. Wipe Down the Benches to remove Sweat Stains

Start by gently wiping down the benches with a damp cloth soaked in warm water. This helps remove any sweat, oils, or residue left behind from previous sauna sessions, preventing the growth of bacteria and mold.

2. Clean the Dirt Off the Walls and Ceiling

Use the same bucket of warm water to wash the sauna walls and ceiling, paying special attention to areas that are prone to build-ups, such as corners and joints. Regular cleaning of these areas helps maintain the natural wood’s appearance and prevents discoloration.

3. Sweep and Mop the Floor

Before mopping, sweep the floor thoroughly to remove dirt, hair, or small debris that might have accumulated. Follow this by mopping with a mild detergent solution to make sure the floor is clean and free from any lingering grime or bacteria.

4. Address Stubborn Stains

For persistent stains, apply a soft brush gently to the affected area with a bit more pressure. Always be cautious to prevent any damage to the wood, using gentle strokes to preserve its natural finish.

5. Inspect and Clean Glass Surfaces

If your sauna has glass doors or windows, clean them with a safe, non-abrasive glass cleaner to remove fingerprints and streaks. Regularly cleaning the glass not only improves the sauna’s aesthetic but also allows for light to filter in, enhancing the sauna experience.

Cleaning the Sauna Heater and Stones

Cleaning the sauna heater and stones is essential for maintaining your sauna’s efficiency and longevity. Regular attention to these components confirms that the sauna operates safely and provides optimal heat distribution.

1. Turn off and Disconnect the Heater

Begin by establishing the heater is turned off and completely cool before you start any cleaning activity. This protects you from burns and prevents any electrical hazards during the cleaning process. The breaker must be off or the power must be disconnected before continuing.

2. Remove and Clean Stones

Carefully remove the sauna stones from the heater, taking note of their arrangement for reassembly. Rinse the stones thoroughly with clean water to remove any dust or residue build-up, and let them dry completely before placing them back. Stones need to be cleaned annually.

3. Inspect for Damage

While you have the stones removed, check them for any cracks or signs of wear that might affect their performance. Replace any damaged or worn stones with new ones to maintain efficient heat distribution. Ensure that nothing has fallen between the elements.

4. Wipe Down the Heater

Use a damp cloth to gently wipe the external surface of the heater, removing any grime or dust accumulation. Avoid soaking the heater to prevent any water damage to electrical components. You can use compressed air to clean out the inside of the heater, if any dust has fallen inside.

5. Check the Inside of the Heater

Inspect the inside of the heater to ensure it is not clogged with dust or debris, which could impede airflow and heater efficiency. Use a flashlight to look down below the rock tray. Use a small brush or vacuum to gently clear out any obstructions. Compressed air can be used to blow out dust.

6. Reassemble Carefully

Once everything is clean and dry, reassemble the stones into the heater, arranging them for optimal air circulation. Secure any components that may have been removed, ensuring everything is tight and properly positioned.

How to Manage Odour and Sanitization Guide for Saunas

Most sauna odors come from three primary sources, such as:

  • Human perspiration
  • Trapped moisture leading to mildew
  • Natural wood aging

While some woody scents are pleasant and expected, others require immediate attention. The key is distinguishing between natural aromatics and problematic odors that signal the need for cleaning or maintenance.

Here are proven methods that balance cleanliness with material preservation:

Essential Oil Treatment

Mix these natural sanitizers with water in a spray bottle for a chemical-free cleaning solution:

Eucalyptus Oil (10 drops per 16 oz water)

  • Provides natural antibacterial properties
  • Creates an invigorating atmosphere
  • Helps clear respiratory passages

Tea Tree Oil (8 drops per 16 oz water)

  • Offers powerful antifungal properties
  • Fights bacteria effectively
  • Provides a clean, medicinal scent

Lavender Oil (12 drops per 16 oz water)

  • Delivers gentle antimicrobial action
  • Creates a calming environment
  • Helps mask unwanted odors

Hydrogen Peroxide Solution

For deeper sanitization, create a natural disinfectant by mixing one part 3% hydrogen peroxide with ten parts water. This solution effectively kills bacteria without leaving harmful residues or damaging wood surfaces. Apply with a soft cloth, focusing on areas that receive the most skin contact, such as benches and backrests. Make sure you test on a sample piece of wood first.

How to Prevent Odor and Bacteria in Your Sauna? 

Prevention is always more effective than treatment. Implement these practices to maintain a fresh-smelling sauna:

  • Ventilation Management: Keep the sauna vents open for at least 30 minutes after the last session. This simple step allows moisture to escape and fresh air to circulate, significantly reducing the likelihood of mold and mildew development.
  • Regular Cleaning Schedule: Maintain the cleaning schedule outlined in our maintenance checklist, paying special attention to the following:
    • Benches and backrests after each use
    • Floors and walls monthly
    • Complete sanitization annually
  • Moisture Control: Install a small dehumidifier or moisture-absorbing products in your sauna room when not in use. This helps prevent the growth of mold and mildew, particularly in humid climates or during rainy seasons.

When to Consider Professional Treatment?

While regular maintenance typically suffices, certain situations warrant professional intervention. Consider professional sanitization services if you notice the following:

  • Persistent musty odors despite regular cleaning
  • Visible mold or mildew growth
  • Unusual discoloration on wood surfaces
  • Strong, unpleasant odors that won’t dissipate
Quick Refresh Techniques – Between deep cleaning sessions, maintain freshness with this quick solutions. Create a natural refreshing spray by combining the following: 2 cups distilled water, 1/4 cup white vinegar, 15 drops of your preferred essential oil. Spray lightly after each use, focusing on areas with direct skin contact.

Tailor Your Wellness Experience: Discover Home Saunas Today

A clean sauna is integral to an enhanced sauna experience. By following these steps and investing a little time into regular maintenance, you’ll keep your sauna in pristine condition for years to come. Embrace the benefits of a well-maintained sauna and enjoy the wellness it provides.

Are you ready to create your own tranquil oasis at home? Home Saunas is here to help you transform your space into a luxurious retreat that promotes relaxation, wellness, and peace of mind. Our comprehensive range of DIY sauna kits and expert guidance make it easy for you to build your dream sauna. Our team is dedicated to helping you choose the perfect design and materials to suit your style and needs, ensuring you are satisfied from start to finish.

Contact Home Saunas today and open a new level of health, relaxation, and joy with your tailored sauna experience!

Clear the Steam – How to Make a Sauna at Home?

Creating a personal sauna at home represents more than just a construction project—it’s an investment in your daily wellness routine. A home sauna provides convenient access to the therapeutic benefits of heat therapy while potentially increasing your property’s value. Before beginning this project, understand that building a home sauna requires careful planning, attention to safety requirements, and proper adherence to local building codes.

This guide will walk you through the building process, whether you’re considering an indoor sauna for year-round use or an outdoor sauna for a natural setting.

Table of Contents

Understanding Types of Saunas and Components

Material Selection

How to Build a Sauna at Home: A DIY Step-by-Step Guide

Essential Components and Preparation

Pre-Construction Phase

Step 1: Framing Construction

Step 2: Insulation and Vapor Barrier

Step 3: Interior Paneling

Step 4: Ventilation System

Step 5: Bench Construction

Step 6: Heater Installation

Step 7: Final Components

Final Inspection Checklist

Customization and Upgrades

Maintenance and Care Tips

Safety Considerations

FAQs

Is it cheaper to build or buy a sauna?

How do you turn a shower into a sauna?

Do indoor saunas need to be vented?

Wellness Awaits: Discover the Home Sauna Experience

Understanding Types of Saunas and Components

Before starting construction, consider your options:

  • Traditional Finnish saunas with electric sauna heaters
  • Traditional Finnish saunas with wood burning sauna heaters
  • Infrared saunas for lower temperature therapy
  • Hybrid models combining different heat technologies
  • Steam Rooms with a specialized steam generator

The heating system you choose – whether a traditional electric heater, wood burning, or infrared panels – will influence your construction requirements. Each heat source has specific installation and safety requirements.

Material Selection

The choice of materials is crucial for durability and safety:

  • Cedar boards are preferred for their durability and aromatic properties
  • Sauna walls require proper insulation and vapour barriers
  • The type of wood selection affects both aesthetics and performance
  • Glass panels can be incorporated for a modern look
  • Sauna benches must be carefully constructed for comfort and safety

How to Build a Sauna at Home: A DIY Step-by-Step Guide

Before beginning your sauna construction project, it’s crucial to understand that this guide provides general instructions that may need to be adapted based on your specific kit and circumstances. The measurements and instructions provided are meant to serve as a baseline and may differ depending on your order and local requirements.

Essential Components and Preparation

Component/RequirementSpecification/Detail
Wood Type for Framing/StudsStandard 2×4 SPF (Spruce-Pine-Fir)
Wall Framing Spacing16″ on centre
Height Requirements84 inches Minimum
Wood RestrictionsNo pressure-treated wood is allowed inside the room
Electrical Wiring WorkMust be performed by a certified electrician
Customer-Supplied MaterialsFraming material & Insulation

Note: Before purchasing any materials, contact your local building department to obtain the necessary permits. Most jurisdictions require both building and electrical permits for sauna installation. Additionally, schedule a consultation with a licensed electrician to evaluate your home’s electrical capacity, as sauna heaters typically require dedicated 220V circuits.

Pre-Construction Phase

Before beginning physical construction, ensure you have:

  • Obtained all necessary permits
  • Reviewed local building codes
  • Verified all materials against your kit list
  • Consulted with necessary professionals
  • Prepared adequate workspace

Step 1: Framing Construction

The foundation of your sauna begins with proper framing.

Basic Requirements:

  • Use standard 2×4 SPF wood
  • Frame walls on 16″ centers
  • Standard interior height: 84″

Process:

  1. Layout top and bottom plates
  2. Mark stud locations (15¼” intervals)
  3. Build door frame (28″x75″ standard rough opening)
  4. Construct L-frames for corners
  5. Install blocking between studs, for heater mounting & benches
  6. Create vent openings

Important Note: Never use pressure-treated wood indoors, as it can release harmful chemicals in high temperatures.

Step 2: Insulation and Vapor Barrier

This critical step ensures proper heat retention and moisture control.

Installation Sequence:

  1. Install R-12 minimum insulation in the ceiling (primary heat loss area)
  2. Install R-12 insulation in the walls
  3. Cover with foil vapor barrier
  • Shiny side-facing sauna interior
  • Overlap sheets on top of the studs
  • Staple to studs to create a seal
  • Wall spacers can be used above the vapour barrier to create an air gap
  • Foil tape is not required, but can be used to seal tears

Warning: Proper vapor barrier installation is crucial for preventing moisture damage to your home’s structure.

Step 3: Interior Paneling

Proper tongue and groove paneling installation is essential for aesthetics and function.

Installation Order:

  1. Start with ceiling installation
  2. Continue with the back wall
  3. Install side walls
  4. Complete the front wall last

Critical Notes:

  • Leave ½” space on the floor for moisture protection
  • Ensure all boards are level. Use a rubber mallet to tap the boards into place
  • Check fit around all openings & maintain consistent spacing
  • The bottom board of each wall should have a square rip and an 1/8″ gap to the floor
  • The V-joints on the T&G should be offset on adjacent walls

Step 4: Ventilation System

A properly functioning ventilation system is crucial for sauna operation.

Components:

  • Inlet vent (metal louvered vent for a 3″x10″ R/O)
  • Outlet vent (cedar slider vent for a 3″-4″ round opening)

Installation Guidelines:

  1. Install an inlet vent behind the heater near the floor
  2. Place outlet vent on opposite wall, 3-4 feet high
  3. Ensure airflow can move into an adjacent room, using an air tunnel or 4″ dryer hose (if necessary)
  4. Verify all seals and connections, install a cover on the outside (not provided)

Step 5: Bench Construction

Benches must be both comfortable and structurally sound.

Assembly Sequence:

  1. Assemble and install bench frames. Start with the main benches first
  2. Anchor bench frames to the back wall for stability
  3. Measure the distance from wall to wall, to cut the bench tops for a perfect fit
  4. Assemble bench tops, fascia and cross pieces outside the sauna room
  5. Mount the assembled bench set on the frames. Secure all components from underneath
  6. Install frames for L-benches. One frame will be touching the bottom main bench
  7. Mount the L-benches, using the 2×2 hanger to secure at the bench junction
  8. Test for stability

Step 6: Heater Installation

Safety Notice: This step MUST be performed by a certified electrician.

Process:

  1. When framing, install a nail board behind the heater mounting location
  2. Have your electrician run the wire to the install location before installing foil on the inside
  3. Ensure the temperature probe is properly mounted above the heater, and secured in the wall
  4. Install mounting brackets once T&G installation is complete
  5. Lay the heater flat on the floor, so your electrician can complete the electrical connections
  6. Mount the heater on the brackets, ensuring proper clearance
  7. Position heater guard, anchoring the wall supports for stability

Step 7: Final Components

Complete the sauna with:

  • Cedar duckboard flooring, bench skirting, and fixed back rest
  • Door installation
  • Window installation (if included)
  • Trim work, including corner trim and door casing
  • Final hardware including thermometer and other accessories

Final Inspection Checklist

ComponentVerification Points
✔️ Door– Door swings outwards freely before securing frame
– Door is flush to frame on the outside, and properly levelled
– Door casings properly attached to cover transition
✔️ Heater– Mounted at the manufacturer’s recommended height
– Temperature probe installed at correct location
– Heater guard installed correctly with proper clearances
✔️ Floor– ½” spacing between duckboards
– Duckboard is levelled, use rubber footing if there is a slope
– Duckboard not installed inside heater guard area, cut to size
✔️ Benches– Frames secured to the wall for stability
– Bench crosspieces aligned with bench frames
– Benches properly attached to frames, with screws concealed
✔️ Ventilation– Inlet vent behind heater near the floor
– Outlet vent on the opposite corner, 3-4′ from floor
– Vents are fitted and secure, and open and close properly

Customization and Upgrades

After constructing your home sauna, the real fun begins with customization and upgrades, which can further enhance your sauna experience and make it uniquely yours. Here are some ideas to personalize your new retreat:

  • Lighting Options. Enhance the atmosphere by installing LED lights that change colors. This allows you to set different moods for relaxation, invigorating sessions, or romantic retreats.
  • Sound Systems. Add a built-in sound system or Bluetooth speakers to enjoy soothing music or guided meditations, elevating your sauna experience to a more immersive level.
  • Aromatherapy Infusion. Incorporate a diffuser or dilute some aromatic oils in with your bucket of water. Ladling infused water over your sauna rocks will infuse your space with calming or invigorating scents for a more sensory experience.
  • Additional Benches. Increase seating capacity by adding more benches and accommodating family and friends while providing multiple levels for varied heat exposure preferences.
  • Control Upgrades. Consider your control panel options factoring in the install location and your preferences. Options are available for outdoor locations. Digital controls can be installed up to 100′ away from the sauna room.
  • Custom Wood Finishes. Our sauna guard stain preserver can be used to maintain the appearance of the cedar inside the sauna room. Consider staining or finishing the exterior to a touch of elegance and personal style to your sauna.
  • Built-in Storage. Maximize your space’s functionality by incorporating shelves or racks for towels, robes, and other sauna essentials, keeping everything within easy reach. These can be installed inside the sauna room, or outside in the changeroom.

By customizing your sauna with these enhancements, you can create a highly personalized space that reflects your preferences and supports your wellness goals.

Maintenance and Care Tips

Regular maintenance and care are essential for extending the life of your home sauna and establishing a consistently enjoyable experience. By following these tips, you can keep your sauna in optimal condition and preserve the quality of its features:

  • Regular Cleaning. After each session, wipe down all surfaces inside the sauna with a clean, damp cloth to remove sweat and residue, prevent buildup, and maintain hygiene.
  • Avoid Toxic Chemicals. Detergents or other chemicals should not be used inside the sauna room. If necessary, choose mild, non-toxic cleaning solutions specifically designed for sauna rooms to avoid damaging the finish or affecting the wood’s natural aroma.
  • Inspect for Wear and Tear. Regularly check elements such as the benches, door seals, and heating unit for any signs of wear or damage to address potential issues before they become significant problems.
  • Wood Conditioning. Occasionally, a specifically formulated wood conditioner can be applied to the sauna’s wooden surfaces. This helps preserve the wood’s appearance and prevent it from drying or cracking.
  • Ventilation Maintenance. Ensure that the ventilation system is always functional and blockage-free, as this is important for appropriately regulating heat and moisture levels.
  • Monitor Heater Performance. Check your sauna’s heater to confirm it’s operating correctly and efficiently; routine inspections by a professional can help prevent potential malfunctions.
  • Periodic Deep Cleaning. Schedule a deep clean annually, which may involve disassembling some parts to thoroughly clean hard-to-reach areas and perform more intensive upkeep tasks.

By incorporating these practices into your regular sauna maintenance routine, you can establish a safe, clean, inviting atmosphere that enhances your relaxation and wellness.

Safety Considerations

When constructing and using your home sauna, prioritizing safety is paramount to confirm a secure and enjoyable experience. Here are essential safety considerations to keep in mind:

  • Structural Integrity. Regularly inspect the sauna’s structure, including walls, ceilings, and benches, for signs of wear, damage, or instability, addressing any issues immediately to prevent accidents.
  • Electrical Safety. To prevent electrical hazards in your sauna, engage a licensed electrician to handle all electrical installations and wiring, making sure they meet local codes and standards.
  • Temperature Regulations. Familiarize yourself with and follow the recommended temperature settings to avoid overheating, establishing a comfortable and safe sauna experience.
  • Time Limits. Establish and respect time limits for sauna sessions, typically between 10-15 minutes for beginners, to prevent dehydration or heat exhaustion. Take a cool shower or relax between sessions.
  • Ventilation. Maintain effective ventilation within the sauna to regulate heat and moisture levels, preventing suffocation or overheating.
  • Door Safety. Install a sauna door that opens outward and does not lock from the inside to allow for easy exit in an emergency.
  • Hydration. To replenish fluids lost through sweat and prevent dehydration, encourage proper hydration by drinking water before and after sauna sessions.
  • Supervision. To prevent accidents or misuse, ensure that children and vulnerable adults are supervised at all times while using the sauna.
  • Dress Code. Wear appropriate clothing in a public location, such as a towel or swimsuit. This is to protect sensitive skin from high temperatures, to prevent sweat stains, and to maintain hygiene standards.

FAQs

Is it cheaper to build or buy a sauna?

Building a sauna yourself is generally cheaper than buying a pre-built unit but requires more time and skill. However, building your own comes with important considerations:

  • You need basic construction knowledge and skills
  • Must ensure proper electrical installation by certified professionals
  • Requires time investment for planning and construction
  • Need to obtain proper permits and meet local building codes
  • Material quality and proper installation are crucial for safety

Can you turn a shower into a sauna?

While you cannot turn a regular shower into a true sauna (which requires specific construction and ventilation), you can create a steam room effect by:

  • Using a handheld showerhead
  • Close all doors and windows
  • Run hot water to create steam
  • Install a shower dome or curtain to contain heat

However, this is not recommended because:

  • Regular bathroom materials aren’t designed for sustained high heat
  • This can lead to excess moisture damage
  • Lacks proper ventilation
  • May violate building codes
  • It can be unsafe due to improper heat control

Do indoor saunas need to be vented?

Yes, indoor saunas absolutely require proper ventilation. Proper ventilation is crucial for:

  • Temperature control
  • Fresh air circulation
  • Moisture management
  • Safe operation
  • Comfortable sauna experience

Wellness Awaits: Discover the Home Sauna Experience

Building a traditional sauna represents a significant but rewarding project that transforms your living space into a wellness sanctuary. This comprehensive guide has walked you through every crucial step, from initial planning and permits to final testing and customization. You can build a sauna that provides years of therapeutic benefits by following proper construction techniques, using quality materials, and maintaining strict safety standards.

If you’re looking for an easier solution, Home Saunas offers premium sauna kits that include everything you need: pre-cut Western Red Cedar panels, heater, door, and benches. Our kits are customizable to any space and come with comprehensive installation guides. 

Contact us now to learn more about our product!

'